Digital Pack Rat Syndrome
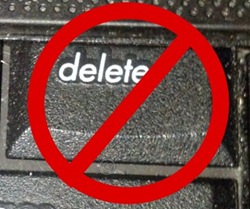
NoDeleteI’ll admit it.  I’m a bit of a pack rat.  It can be very hard for me to part with items, no matter how insignificant they may seem.  Of course, over the years, this means that I’ve accumulated a lot of stuff whose use has long since past.  I’ll often try to push off dealing with it by telling myself that I could sell the items, but deep down I know that putting together a garage sale just doesn’t fit in with my "very little free time" lifestyle.  So eventually I give in and either throw the items away, or find someplace to donate them to.

Still, it pains me to throw something out.  My brain rebels and asks "what if I need this some day?"  Never mind the fact that the item has sat unlooked at for five years and I am not likely to need it ever again.  No, in that moment where the item hovers over the trash bin (or donation bag), it suddenly seems immensely important to my life.

We also have two hard drives that I back our computers up to every so often (at least once a month if not more).  The two drives mirror each other so that we don’t lose data if one goes bad.

What does this have to do with tossing unused items?  Well, my packrat nature extends to the digital realm as well.  I keep every photo (no matter how blurry), every video (even if it is so dark and noisy that it is useless), and every document I’ve created (even if the subject is horribly out of date).

Though I’ve tried to impose some order on the mass of bits and bytes, I haven’t been completely successful.  Our 1 TB drives have less and less free space on them.  Much of that is actual data, but some consists of old files that I don’t really need anymore.  Pretty soon, I might have to upgrade to a 2TB or even 3TB hard drive.  (Probably not a bad idea to move to newer drives anyway as an older drive is more likely to die.)

I should go through the files and folders and get rid of items that I no longer need.  Log files from a decade ago for a website I’m no longer running should be deleted, not buried deep in the folder structure.  Still, just like with physical objects, I feel pained deleting anything.  I will find any reason whatsoever to keep the files as my finger hovers over Delete.  What if someone wants to know just how many visitors I got in May of 2003 on that long-defunct website?  How will I tell them if I delete the log file?!!!

In many ways, getting rid of digital items is much easier than physical items.  Instead of putting them in a trash bag and dragging it to the garbage can, you simply hit the delete button.  Unfortunately, getting past the "well, I can just keep it" rationalization for digital items can be a lot harder.  After all, they are just 1s and 0s on a small hard drive.  They aren’t taking much space and aren’t collecting dust.  So why not keep that blurry photo, long out-dated document, and collection of unneeded log files?

Perhaps some day, I will roll up my sleeves and unclutter my digital space.  Until then, if you’ll excuse me, I think I need to look up prices for bigger hard drives.

Backup Often… But Not Too Often!

This past weekend was a busy one.  It all started on Saturday night.  I came home to find an e-mail in my inbox alerting me to a problem with my dedicated server.  It seems as though TechyDad.com had somehow filled up the partition by growing to 44GB large!

Now, TechyDad.com (along with TheAngelForever and the other sites I run) don’t usually take up that much room.  Not nearly that much.  I began performing some backups and looking at some old databases that might be taking up the extra space.  At first, I couldn’t find anything.

Then, I located it.  The directory where I backed up my mySQL databases was about 39GB large.  As I looked through the directory, I realized what went wrong.  The previous day, I had noticed that my daily backup routine was failing to e-mail me the file.  Thinking that it might be the size of the backups, I altered which databases were backed up.  Then, realizing that I’d need to wait a day to see the results, I set the backup to occur every 15 minutes.

Then, I made my big mistake: I got distracted.  Other matters came up and I forgot all about testing the backups.  But the backups didn’t forget.  They kept going.  Every 15 minutes they would complete another backup.  Every hour, 4 backups would be done.  In no time at all, megabytes of backups turned into gigabytes until the entire disk was flooded.

Thankfully, once the server was running properly again (thanks to plenty of help from a friend of mine), fixing the root cause was easy.  I set the backups to run once a day and I deleted the extra backup files.  Before long, we were back to normal operations.

There are three lessons to be learned here.  First, everyone messes up, including Techy Dads.  Second, backup often… but not too often.  And third, don’t get distracted when you’re doing important work!

Laptop Surgery

On Sunday, I laid my patient down on the operating table and, having planned the procedure out, began opening him up.  No, I didn’t just switch day jobs to become a surgeon.  I was trying to fix my laptop.

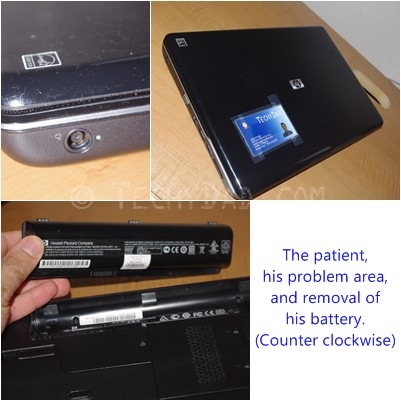
You see, for the past few weeks, I’ve been having problems with my laptop charging.  I’d plug it in only to have it not recognize that it was plugged in.  I would need to wiggle my laptop around, changing positions until it finally realized that it didn’t need to run from battery.  One day, I illuminated the laptop’s power plug with a flashlight while gently pressing on said plug with a piece of plastic.  The plug wiggled like a child’s tooth that was getting ready to pop out.  I figured this was the problem, so I steeled myself for some laptop surgery to repair it.

Now, I may be "techy", but I’ve never done anything like this.  I’ve built my own desktop computers, but that’s easy.  This was a *LAPTOP* computer.  Completely different, right?  Super hard to get into, right?

Turns out, it isn’t that hard.  Luckily, HP had all of the instructions on their website.

The first step was to remove the battery.  This is very important.  Not only can’t you reach certain screws with the battery in, but you don’t want any chance of electricity coursing through the patient’s veins… I mean circuits while you’re handling his electronic guts.  That would be bad for both doctor and patient!

laptopsurgery1

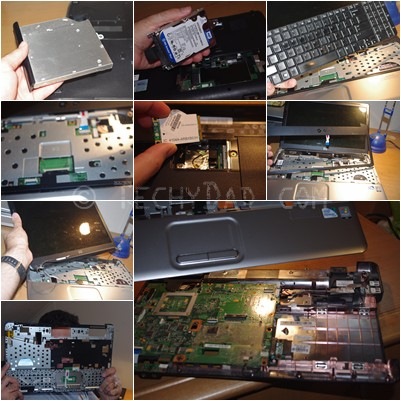
After this, I took apart the patient bit by bit.  Optical drive, hard drive, WLAN card, keyboard, and even the screen came off.

laptopsurgery2

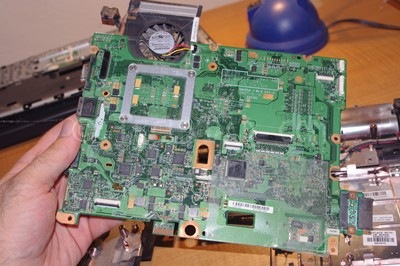
Soon, I was left with just a bare circuit board on a base.

laptopsurgery3

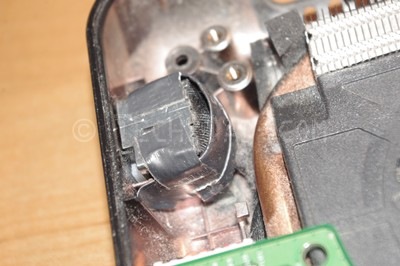
A quick look revealed the problem.  The plug is supposed to sit between two metal plates which hold it in place.  However one plate was cracked.  I fashioned a quick "sling" out of duct tape, but Google searches revealed that duct tape can melt inside the hot environs of a laptop.  Obviously, that would be bad for the patient, so I asked for a second opinion and got a recommendation of electrical tape.  Leaving the patient on the operating table, JSL and I ran over to Home Depot.  They confirmed that electrical tape will lose adhesion, but not melt.  One purchase later and my laptop was taped up.

laptopsurgery4

Now, I just needed to put it back together without losing any pieces.

laptopsurgery5

Here’s a hint: If you ever do this, be very careful of EVERY SINGLE PIECE YOU TOUCH.  You never know when you might turn over a piece, hear *clink* *clink* and then realize that you didn’t take one of the tiny screws out of that piece.  And once you hear the *click* *clink*, that screw is lost forever.  Luckily, I was able to transplant a screw from another part to replace the missing screw.  (That area had 3 screws holding it in place.  I think it can make due with 2 instead.)

Finally, my laptop was back together.  But was the patient well?

laptopsurgery6

The patient survived!  There were cheers all around, but I realized we weren’t out of the woods yet.  I had to try plugging in the patient.  Thankfully, this worked beautifully.  The patient was quickly recharging and gaining (battery) strength.

However, in many surgeries, there are often complications after the surgery is over and done with.  In this case, the patient began exhibiting the same weird "not charging" behavior after being sent home (aka being taken downstairs to the couch).  But it would charge some times.

I was about the deem the surgery a failure when I noticed that the power cord worked when it was bent at a certain angle.  Straighten it out and it didn’t work at all.  (Carefully bending/unbending while keeping the plug still eliminated the possibility of the laptop itself being the cause.)  So there was a secondary issue at play.

For now, I’m prescribing keeping the cord bent until a suitable replacement can be purchased.  In the meantime, this was a very valuable learning experience.  Even the techiest of us have to do things for the first time.  When you haven’t done something before, it can seem impossible and scary.  But if you plan it out and are very careful, you might just surprise yourself with what you can do!

Performing Laptop Surgery

On Monday, I discussed how my laptop has been acting up.  I had resolved to buy a new power adapter/cord to see if that was the problem.  After all, they’re cheap (about $20) and hopefully that would be it.  Yesterday, though, I got an idea.  I couldn’t see if the power connector on the laptop itself was moving when I plugged it in.  The plug’s just too big.  But what if I (gently) pushed on it with something smaller.  Taking the earpiece from my Jabra bluetooth set and a flashlight, I poked at the connector… and it moved.  A lot.  It was kind of like how a kid’s baby tooth may wiggle just before it falls out.  And, no, this was not reassuring.

I began to worry that this was unfixable.  After all, I’ve never opened up a laptop that much before.  Desktop computers, yes.  I’ve even built those from scratch.  No big deal.  But laptops?  Even if I got it open, I figured that the component would need to be soldered in place and I had neither the tools nor the know-how to do this.  While I’ve been intrigued with soldering for awhile, I’ve never attempted it and a laptop computer’s power connector seemed like a bad first project.

So all was looking grim when a co-worker helped me track down some repair manuals for my laptop.  We poured over them as they detailed how to take the laptop apart piece by piece.  Then, it came to the power connector.  I was surprised to see that it isn’t soldered on at all.  Instead, it is plugged into the motherboard and clips on the inside of the case.  It probably just worked its way loose.  Suddenly, things were looking brighter as a plan formed.  I could use the manual to take my laptop apart, piece by piece.  Then, I would fix the broken power connector.  Finally, I would put it all back together again.  Hopefully, all will go well and my laptop will be as good as new.

This will be some delicate laptop surgery, though.  I’ve never tried anything like this before, but then again isn’t that how you learn?  At one point, I had never used a computer before and look at me now!  I will try to take a few photos to document it for a later post.  Hopefully, laptop guts aren’t too graphic for anyone.  Here’s hoping that, by next week, my laptop is fully recovered from the surgery with a healed power connector.

Have you ever taken apart a laptop computer, desktop computer, or any other piece of technology?

Proprietary Plugs, Dead Drives and Irritating Interfaces, Part 2

Yesterday, I wrote about my father-in-law’s dead hard drive with the proprietary plug.  To continue the tale, we must first go back a bit.  My father-in-law and mother-in-law recently went on a trip to Disney World.  (Side Note: Given our Trip That Never Was, I’m jealous of them.)  During their trip, they found that their many photos and videos was causing them to run out of memory card space.

They had no computer to offload the photos to, but they did have their iPad.  Off went the photos and videos to the iPad.  Photos were deleted from the camera and they had room for more photos until they bought an additional memory card.  Problem solved, right?

Well, not so much.  Recently, they saw that their iPad was going to be upgraded to iOS 5.  From reports we’ve heard, this can cause data loss at times.  In any event, it is always a good idea to do a full backup before any major upgrade.  Indeed, it is a good idea to backup your files on a regular basis.  Besides, iTunes was reporting that they didn’t have enough disk space free to install iOS 5.

After freeing up some disk space, we went through the process of getting their photos and videos off the iPad.  When we plugged the iPad into the computer’s USB port, I expected it to show up as a drive.  This is what happens with pretty much any device I hook up to my computer.  My camera shows up as a drive.  My phone shows up as a drive.  Even Kimberly Kindle lets me transfer files via a mounted drive when it is connected via a USB cable.

The iPad does show up as a device and we can use a file transfer wizard to get the photos, but the two problems that persist are:

1) The photos are renamed.  Instead of being named along the lines of P12345.jpg, they are named “Disney Photo 001.jpg”.  To make matters worse, the photo order is messed up.  “Disney Photo 023” might have actually been taken before “Disney Photo 022” and after “Disney Photo 024”.

2) The videos aren’t transferred.  This is huge.  They captured some really nice videos at Disney and loss of them is just not an option.

NOTE: We can’t simply sync using iTunes because iTunes insists that it needs to load iOS 5 during the next sync.  We also can’t, apparently, stick in a blank SD card and transfer files to that. The Apple store representative told us that file transfers from SD cards are one way only.  To the iPad.

Luckily, I’ve done some research and I’ve come up with two possibilities.  Note, I’m just presenting these as options.  I haven’t tried these (as of this writing) so they may or may not work properly (or they might work properly but not solve the particular need I have).

The first option is an app called GoodReader ($4.99).  This app, among other things, lets you sync your files across an FTP folder.  I could set up my father-in-law with some FTP space, sync up his files and then FTP them back to his computer.  This seems a bit convoluted, though.  It’d be better if I could just sync directly with his computer.  Enter option 2.

The second option is iPad Manager ($25).  This looks like it could be what we are looking for.  It claims to allow the user to plug the iPad into a PC’s USB port and transfer videos, photos, songs, etc.

While this sounds good, a more standards-compliant approach, such as showing a mounted drive on the computer, would have been preferable.  Then, we could have used the built-in file explorer that every computer (Mac or PC) to copy the files.  Alternatively, allowing you to copy files to an inserted SD card would have sufficed.  To require you to jump through hoops or use additional programs just to retrieve your own photos/videos seems completely unnecessary.  For a company which prides itself on a smooth user experience, this has been quite the bumpy ride.

Have you ever transferred videos/photos off of an iPad?  If so, what did you use?

1 2 3 4 5 6